How to post a picture of your lotto blocks
(with shameless borrowing from Blogger’s help files!)
Once you’re set up as a blog author on this blog, you’re ready to post your lotto blocks! Be sure you have your picture loaded onto your hard drive somewhere before you start.
Go to blocklotto.blogspot.com, and click the Sign In link in the upper right corner. This will open your Blogger Dashboard. If you have your own blog on Blogger, or contribute to other group blogs, you’ll see them all listed here. If you’re only contributing to the Block Lotto blog, you’ll only see it listed in the Manage Your Blogs section. Here’s what mine looks like; yours might have fewer options for what you can manage:
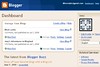
(all the images in this post are clickable for a bigger version)
To post your photo(s), you’ll need to make a New Post. From the Dashboard window, click on +New Post.

That will open a page with a post editor. In many ways, this is similar to how the forum works – you’ll see a space for writing any text, and some tools for editing the text and posting pictures. (Please use only the DEFAULT settings for font, font size and color.)
![]()
First, create a title for your post in the Title box. Please include your name and/or your forum name in your post – something like Suzy’s July Blocks.
Now for the fun part!
Click the Add Image button on the editing toolbar. It looks like a little picture.
![]()
This opens a new window that allows you to select the image(s) from your computer. For this tutorial, we’ll use the Add an image from your computer option. Click the Browse… button to locate your image on your hard drive.
![]()
Once you’ve found your image, click Open (weird, I know!), and you’ll return to the Blogger window. Now, click the big orange Upload Image button in the bottom left.
![]()
Blogger will think for a moment, then return with Your image has been added. Click the blue Done button to return to your post.

Now, you’ll see your image in the text editor. (WHEW!)
If you want to write a message about your blocks, now’s the time to do it. Just type it into the editing box.
To add a label to your post (this makes it easier to search for all the photos from a given month), click the Show All link to the right of the Labels field:
![]()
This will give you the list of available tags. Choose july blocks for this month, and sampler (not shown in this image).
![]()
One last step, and you’re done! Click the big orange Publish Post button.

You’ll get this last window confirming your post was successful — click the View Blog link to see your picture on the blog!![]()