Two More (Blue) Roses and Tips on Adding Green Background
I know I said I’d make more blocks–in some other color besides blue. But these fabrics were out and calling to me this afternoon.

As I was making them, I realized that in my directions for making the block, I say something like, “add green fabrics to make the block square,” which is right up there with “quilt as desired” with being next to useless So here are some notes (and photos taken today) that explain how I approach that last step.
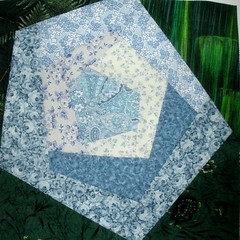
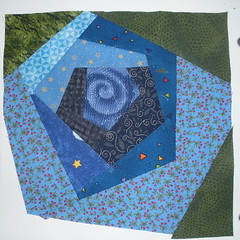
- When you have added enough logs (aka petals) and the rose because a good size, then figure out what orientation it will have in the final block. Personally, I try to avoid having any long edges along an edge, because it starts to turn into a “house” in my mind. Begin by adding green background to the open spaces to complete one side and the corners on each end.
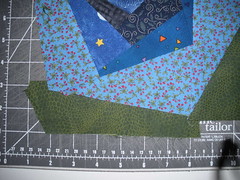
- Trim that side and both corners to size–9.5 inches square. At this point, you will be able to know for sure if any part of your rose will be chopped off in the finished block–you can go ahead and trim them off now. You’ll also be able to see the shape of the open spaces to be filled with green (leaf) background. Notice how the point on the right side of my rose in the photo on the left has been trimmed to fit in the right photo.
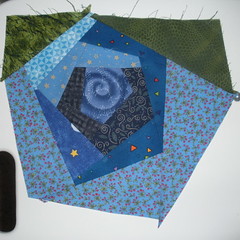
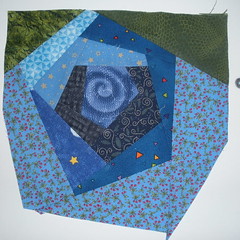
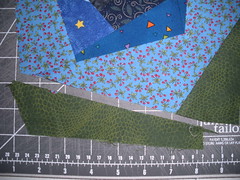
- The blocks will be easier to work with if you make some effort to end up with straight grain along the outside edges, so if you have a triangular space to fill, use a similarly shaped fabric, with the bias on the inside and the straight of grain on the outside edges. I added a triangle shape to the third corner and when it was trimmed, the outside edges were on-grain.
- To cut a piece of fabric to fit the shape, lay the background fabric on the cutting mat so that the straight edge is where you want the side of the block to be, then lay the rose-in-progress over it. Slide them apart a 1/2 inch (or a little more) to account for the bite the seam allowance will take from both the rose and the background, then cut the background even with the edge of the rose.
- Continue to add background and trim after each seam to ensure that there are no surprised and your block will end up being correctly sized.


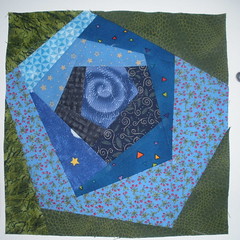
One of the things I love best about quilting is that there are so many ways to do any given thing. You may not “see” the block the way I have and you might not be as anal about creating straight grain edges to your block (and that’s OK), but I thought I’d share how I’m doing it. (And I’ll update my directions with this addition info later).
There is one more thing for this month. If you win AND you are allergic to cats, please be sure to let me know. One of my cats, Grace Hopper INSISTED on “helping” with the fabric selection for these blocks. As you can see from her expression and the position of her ears, she was adamant about it and wasn’t going to budge without a fight . . . so I caved and let her “help”.
I'm looking forward to trying these.
First I keep seeing the roses from the original animated Alice in Wonderland and hearing "we'repainting the roses red"
Second, from your example, starting with a fabric that has a circle or spiral design really tricks the eye to seeing curves in the rest of the layers.
I love the swirly bit you used in the center of your rose – it's perfect!
I agree, the swirl moves your eye in just the right direction.
The swirly scrap really turned out better than I expected. As I make these blocks, I keep learning what works well and what doesn't so much.
Ps. If you don't have spiral fabric, you could certainly quilt in that spiral in the center of the blocks in the finished quilt and it would have the same effect.
Love the roses! Love the cat too! even though cats are in my allergy pallet, I was most anxious to get home from the hospital to have my nurses (2 cars, 1 kitten and a dog) take care of me.
Thanks for some more direction on adding the green, Sophie. This was the tricky part for me. Your cat looks too helpful!