Let’s Get Liberated in May with 5-pointed Stars
Posted by Sophie on May 2, 2012 in blocks | 6 comments

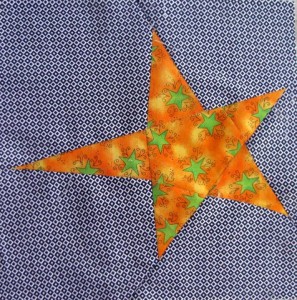
- One of Maree’s stars
The block for May is a liberated, stack and slash, 5-pointed star.
Susan Druding’s directions for the technique are here:
This is one of the blocks that Maree made.
Like many liberated techniques, there is a learning curve–but trying new things and learning is why we’re here, right? If you have not made these before, please allow yourself to fail … because, honestly, isn’t that how we learn?
FABRIC GUIDELINES
Unlike Susan’s stars, ours will be 2-color blocks–one fabric for the star and one for the background. Using the stack-and-slash technique, each fabric you use will become the star in one block and the background in another. Fabrics should be:
- Black & White prints and/or
- Bright solids, tone-on-tones and multicolor prints
If you make multiple blocks, you may repeat fabrics as long as no more than TWO blocks use the same two fabrics.
Also, you may decide if the two fabrics in your blocks will be:
- One Black & White fabric + one Bright fabric, OR
- Two bright fabrics with good contrast between them
BLOCK GUIDELINES AND CONSTRUCTION NOTES
Our star blocks will be 9 1/2 inches square (to finish at 9 inches when sewn into a quilt). I suggested to the sneak peekers that they begin with 13 inch squares and received feedback that this was BOTH too large and too small. This is definitely a case of your mileage may differ, depending upon the angles you choose when you slash your star.
Pay particular attention so that your finished star block will have all five of its points when squared up, with enough allowance so no points will be visually chopped off or hidden (AKA “shy) when your block is sewn into a quilt top. Our stars may have very different proportions, so it is important that they share the characteristic of having FIVE POINTS.
I STRONGLY suggest that everyone begin by making a sample block using two fabrics and use the experience to adjust, if necessary, the size of the squares you will use to make the blocks and the slashes you make to define your star.
Remember that even in a liberated block, we need 1/4 inch seam allowances so that our winners will be able to make quilts with enough structural integrity to last.
If you like this block/technique, once you become confident you could start with a stack of 6-8 fabrics, but for your lotto blocks, I suggest you stack-and-slash only stacks of 2 or 3 fabrics at a time. If, for example, you used a B&W, a bright LIME and a bright PURPLE, you would end up with 3 blocks:
- B&W background, lime star
- Lime background, purple star
- purple backgroun, B&W star
The MAXIMUM number of blocks to make and enter for the drawing is the usual NINE. (This probably means you will start with a stack of three fabrics, at least once.)
The TAG to use for your posts this month: 5 Point Star
As usual, use the CATEGORIES:
blocks – for posts with block photos
sent and received – for posts about mailing and receiving blocks
inspiration – for posts about 5-point star quilts (or other 5-pointed inspiration)
YOUR TIPS
Please share your own experience/tips for making this block, as a comment here or when you post the photos of your blocks. Before you begin, be sure to read through the comments on this post–Linda and Maree have already shared a lot of great info.
THE VIRTUAL QUILT
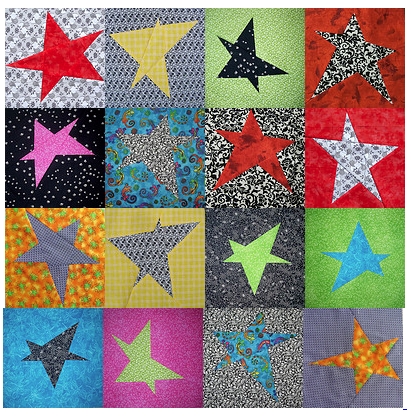
Here’s a (relatively) little virtual quilt constructed from photos of blocks made by sneak peekers, Caroline, Kate, Kathie, Linda, Maree and Wendy. Thanks for the great photos.

You can get a closer look at the individual block photos on flickr, here. If you haven’t yet chosen fabrics, you can learn alot by looking at how different kinds/sizes of prints work in this block by looking at the fabrics in these blocks.


I did a couple of blocks in the sneak peak following the directions (I thought), but I had problems in the final assembly and ended up with interior angles (almost impossible to sew smoothly on a machine). However, I love the appearance of the stars, so it is worth the effort, and I will try to make some more and figure out if I missed a step! But here’s my thoughts: I would stress focussing on the directions about (1) the order of sewing the pieces together into units, and (2) then the order of sewing the units together. (If you print out the directions in black and white, you will need to label the last diagram to show which sections match the “yellow” “lilac” “green” and “blue” units, so you get the order right.) Since your “shapes” may not match hers exactly, this may be confusing. When you sew the small pieces together, you will end up with edges that don’t match. When possible, match the edges/seams on the interior seams and let anything on the outer edges not match (you will be cutting it off anyway). You may want to “even” up seams, cut off corners, etc. like we did on the wonky roses, before joining units together.
If you have not done a slash and swap technique before, the approach of drawing an outline on the wrong side of the fabric, then swapping layers, may add unnecesary confusion to your process when you turn them right side up. It may be easier to mark your pattern on a piece of paper and cut through that laid on top of the 2 fabrics right side up, so you don’t get the pieces mixed up when you swap.
I agree with what Linda says. I found the 13 inch square starting size perfect to start with. I have only made one pair of stars so far as I was waiting to make sure mine were OK. I did mark my shapes on the back of the fabric and then left them upside down like this while sewing together. As Linda says it is imperative to put them together in the correct order. I will make mine in pairs as the tenth star will be kept for my sampler quilt at the end of the year. Also I did find there was a tendency for the block to become a bit wavy as we are working with a lot of biased edges however once trimmed and ironed they appear to be fine.
I had some difficulty sewing these and I definitely encourage you to start with a generous 13 inch square and to pay attention to your cutting and sewing order. I made nice looking stars but the size was a problem as I ended up with flaps on the outside that could not be sewn together-I guess this would be the same as the interior angles that Linda was talking about! Make a sample with some fabric that you don’t really like at first to get the hang of it!
I just realized I did not get the sneak peek! I will try a few of these this week. As usual, I always think I can’t want the new block as much as I want the old block, but I always do!
I love buggy barn techniques, and from what I am reading,this is similar.
I shall see!
glen
I just made two blocks, and then cut them up for my scrap bin. Because there are no seam allowances on the parts, you end up with unmatched seams/star points, as has been mentioned. But the difficult part is the inevitable Y seams. You can tell in advance that you’ll have them simply by looking at the diagram. If I’d followed the directions I’d learned in a workshop 3 years ago for sewing Y-seams (marking, pinning, etc.), then I bet my stars would have turned out great. As it was, I forged ahead blindly and mangled one of them. I got lucky with the other, but still felt it’s not up to snuff. Maybe another day I’ll try this again–I have a bunch of donated fabric that I can use and if I screw up again, it won’t be a big loss. But the stars made so far are really pretty. They remind me of something by Andy Warhol.
Ahhh. Now I see what I did wrong. There are no Y seams. I must have been color blind. I’ll try again tomorrow.