October Block — Halloween Spooky Gallery –Square in a Square in a Square Block
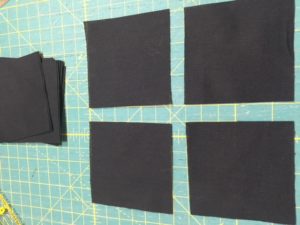
Hi! I’m Linda Newman from Dallas, and this month we’re going to do a really easy block that lets you play with those Halloween and Day of the Dead novelty fabrics from your stash, along with the orange, black, grey, white, purple and lime green colors that our fabric designers have “decreed” as the official Halloween colors. (This is my first try at writing directions for a block or quilt, so apologies in advance for any gaps or confusion, or if I over explain obvious things for experienced quilters. Please ask if anything is unclear). These 3 blocks are lying on black solid fabric to give a feel for how they would look with black sashing.

The central square of each block will be a Halloween figure from a novelty print that will look “on point” when the block is finished– an effect created by adding “sew and flip” triangles in each corner. But the center of the block actually starts as a simple 5 ½ inch square. .The fun part is the “fussy cutting”. The completed block is 9” finished or 9 ½” unfinished. You may make as many as 9 blocks, so long as each is different.
When posting your blocks, please use appropriate categories and tags. Use “October 2018 squares” as the tag, and “blocks” as the category.
- FABRIC REQUIREMENTS.
For each block you will need:
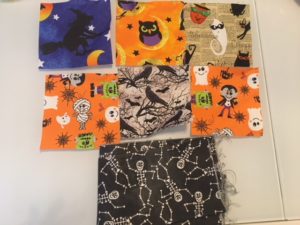
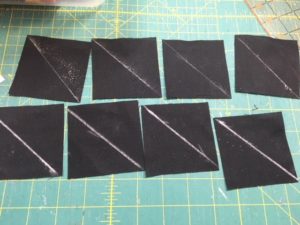
- One 5 ½ inch square Halloween or Day of the Dead novelty fabric featuring a “character” or “figure,” fussy cut so that the character will be in the center of the square, with most of its features still visible when the four “sew and flip” squares are sewed on each corner and flipped to make triangles. Also the “character” should be large enough that it mostly “fills” the center of the square, instead of a print with lots of tiny ghosts, cats or witches. We can live with some toes or hats cut off, but not half the body! Here are some 5 ½ fussy cut novelty squares as examples (the skeleton fabric hasn’t been centered and fussy cut yet).
I have provided a sample template template for square in a square for fussy cutting the square, with a built-in “window” that will show how the character will appear after the triangles are sewed on. You can make your template from template plastic, as my photos show,
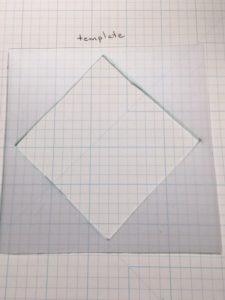
or from cardboard (cereal boxes) or plastic lids from cool whip or similar plastic with enough stiffness that you can use your rotary cutter to cut around the edge. Once you have cut your template and you are using the template on fabric, cut only around the outer edge of the template for the correct dimension of the center square.

.
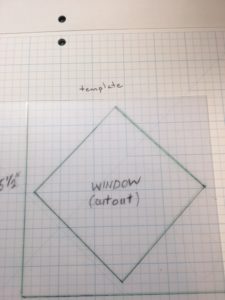
(Cut out the marked diagonal “window” on the template, but do not cut out the window on the fabric square. No need to mark it either – the sewing line will be marked on the small squares. The template window is just for visual placement for the fussy cut). On some prints the figure may not be printed on the “vertical” of the fabric, so your fussy cut square may be on the bias of the fabric. That is fine, but be careful not to stretch the bias edges when you are sewing on the corners and outer strips. [Confession: I now see the skull above wasn’t perfectly aligned on the vertical; he’s tilted a little to the left. Most of the time that won’t even be noticeable but the skull is symmetrical so it does show on close examination)
2. Four 3-inch squares of black solid or black tone on tone fabric that reads as a black (it should not contain any other color or white).
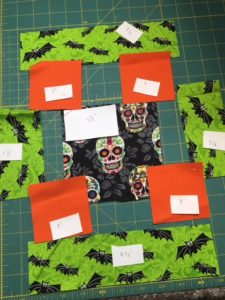
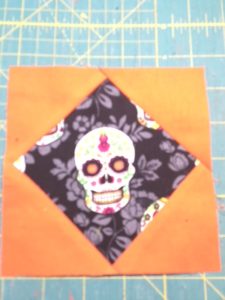
However, if the background fabric of your center square is black, then you should use solid or tone-on-tone squares that are white, orange, purple or lime green that are a different color from the outer border. You want the flipped triangles to contrast clearly with the inner novelty square, so that there is no merging of the “edge”. In the sample block with the skull, the background of the novelty is black, so I used solid orange corner squares for contrast.
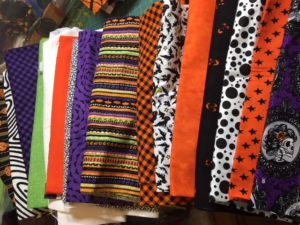
3. One 2 ½ inch strip, times width of fabric (wof) (42”)* of white, orange, purple, or lime green fabric.
These can be solids (but not solid black), tone on tone (not black), or contain small Halloween, Day of the Dead, or compatible prints containing only the permitted colors (black, white, grey, orange, purple, lime green)(examples: bats, cats, spiders, witches, ravens, ghosts, skeletons, ivy, dots, stripes, etc.). If you are using a fat quarter, cut two strips of the same fabric 2 ½ inches by 21”. Here are some sample fabrics that could work as outer border strips:
a. Sub cut this strip into two strips 2 ½ inches by 5/1/2 inches,
b. And two strips 2 ½ inches by 9 ½ inches.
Here’s a photo of all the cut pieces for the block:
4. Fabric guidelines:
A. Halloween and Day of the Dead Fabrics. If you are new to Block Lotto, every month the block instructions will have specific fabric guidelines. The guidelines insure that all the blocks made by dozens of Block Lotto participants will look good together in a quilt made by the lucky winner(s). Please be sure you follow the fabric guidelines.
This month’s fabrics should be Halloween, Day of the Dead,* or black, white, grey, orange, purple and/or lime green solids or tone on tone.
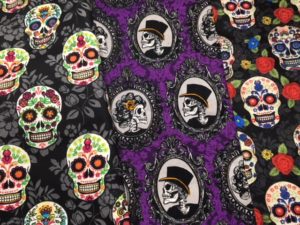
*Day of the Dead is the Mexican culture’s observation of “All Hallows Eve”, October 31-November 2, and is the subject of the recent Pixar film “Coco.” Here are a few of my Day of the Dead fabrics, which often feature skeletons and skulls ornamented with flowers. Sometimes these include some other colors, but stick to the permitted colors for the corner squares and outside blocks. For example, with the skulls below, I would suggest white (or white 3 inch squares for the corners, and then a lime green or purple outer border).
You can use the same black solid fabric for the corner squares in all blocks, and you can repeat the fabrics in the outer borders so long as a different character is in the center, but variety will make a more vibrant quilt. I would suggest that we avoid using “licensed” characters like Peanuts and Star Wars.
B. DO NOT USE AUTUMN FABRICS; that is, NO golds, olive greens, magentas, browns, leaves, scarecrows, fields. Preferably all pumpkins will be jack-o-lanterns or on Halloween-type background fabric).
C. Novelty Fabrics: Each center square should be a different “character,” but you may be able to “capture” more than one Halloween character from the same novelty fabric.
- BLOCK ASSEMBLY.
A. Fussy cut your center square. as described above.B. Mark a diagonal line from corner to corner on the back of each of the four 3-inch black or other solid squares.
(If the square is black, use a white marker or the sharpened edge of a piece of soap to mark it.) The top row in the photo is marked with a Clover chacon white chalk marker, and the bottom row is marked with the edge of piece of hotel soap.
Don’t be tempted to “eyeball” the diagonal without marking – you will get a crooked seam and the flipped triangles won’t lie flat.
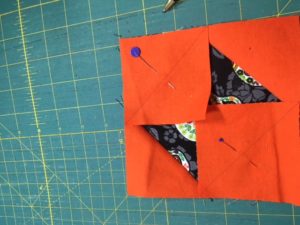
Match two of the squares to opposite corners of the 5 ½ inch square, right sides together. Sew just inside the diagonal line (towards the corner).
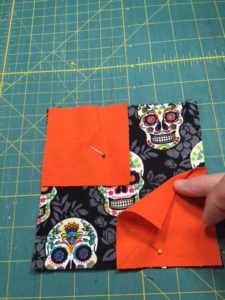
“Flip” the inner edge of the square towards the corner, finger press, and be sure it lines up with the corner edge of the larger square.
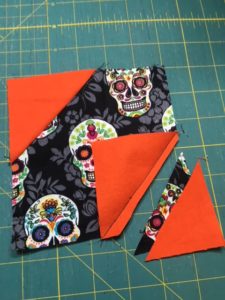
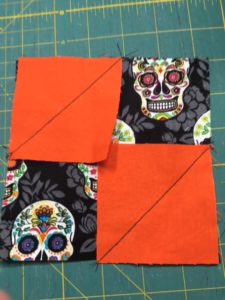
If they match, trim the underneath edges of the big square and the small square, and press with an iron the seam allowance towards the outer corners.
Then repeat with the other two squares and other two corners.
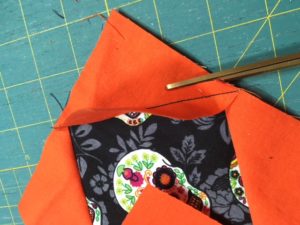
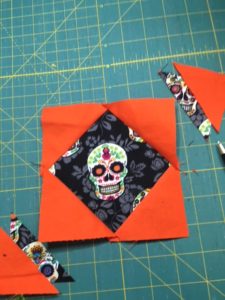
Measure the completed inner block and be sure it still measures 5 ½ inches square and the character is still centered in the square. This has scraggly edges so I had to trim. If this inner block does not measure a true 5 ½ inches around, trim so that it is a true square. (Color difference below due to a camera glitch; disregard!)
- Sew a 5 ½ x 2 ½ inch colored strip to each side of the square, pressing seams to the outside. If you use a print and it has an up and down direction, sew the “bottom” of each side strip to the inner square.
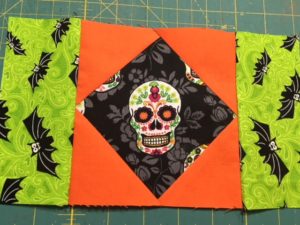
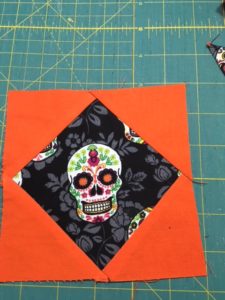
- Sew a 9 ½ x 2 ½ inch strip to each of the bottom and top of the square, pressing seams to the outside. For the top and bottom strips, have their bottoms both face down.

6. Measure the completed block to be sure it measures 9 ½ x 9 ½. If not trim to true up, keeping the character in the center.
- Possible settings of these blocks: Although the winners of these fun blocks will have their own imaginative approaches, I think the blocks could be joined with black or white sashing (with cute little Halloween figures in the cornerstones). Or black and white four patch squares with Jacob’s ladder diagonals could alternate with these square blocks. Or maybe an attic windows setting. Or something like a wanted poster? Large haunted house with these blocks as windows?
Send me a note if you have any questions – pagenew@sbcglobal.net
I have always wanted to make a Halloween quilt. This is a fabulous idea for October. Woohoo. Can’t wait to dig into those novelty scraps to see what I can find.
Thanks! This looks like it could be fun. =)